Monday, May 13, 2013

Kiss My Brass

The door handles in our house were a mix of brushed nickel and brass. You can probably guess which I prefer. Enter spray paint.

Spray paint party in our yard!
The after, re-installed.
How to:
  1. Remove all hardware. I recommend labeling which handles came from which door if yours are left/right specific like mine are.
  2. Wipe down with a coat of liquid deglosser (near the paint thinner at the store).
  3. Stick all the parts in styrofoam or cardboard, including the screws. 
  4. Using Rustoleum Universal Metallic Paint + Primer in One, spray 3 light but even coats with 10-20 minutes of dry time between each.
  5. Flip deadbolt locks back and forth between coats. 
  6. Let them cure for 48+ hours; the longer the better. We lifted that table and carried it into the garage for safe drying.
  7. Re-assemble (make sure you do the screws lightly and by hand so you don't mess up the new paint job) and enjoy!
This update is totally a personal preference detail. I do think it immediately updates the look of your home since most new homes use nickel or oil rubbed bronze vs. brass these days.

We have one lingering brass handle and that's the front door. It will be taken care is this summer when we paint the door though! Adios brass!


Monday, May 6, 2013

Budget Decorating: Our Guest Room

We have a lot of extra rooms at the moment. I'm sure one day they will be filled with adorable, well-behaved, exceptionally smart children. ;-)

For now, we wanted to make our guest rooms feel welcoming without spending a fortune on them.  The upstairs guest room is my favorite of the two. Decorating the whole room cost about $150  including paint. We painted this room when we moved in (as the room had 60+ sailboats stenciled on the wall in paint) and I love the color we chose. It's a soothing beige with hints of a grassy yellow/green.


The bedding was a super clearance find from Macy's Martha Stewart Collection. The entire set with all the pillows was $60. I actually chose the whole color scheme of this room around the bedding. We had the bed skirt, lamps and old IKEA furniture from our apartment. We also had the drapes...I tried to make them work in the city but they didn't. They are definitely too long for the height of these windows but they are hidden from the doorway - out of sight, out of mind.

I found a few accessories at the thrift store or at Homegoods. I love this green vase and throwback college pic. We had the tall "green sticks" as Scott calls them and a black mirror (not pictured above).


I created the canvas artwork with a wooden "S" letter from Michael's with an old canvas, some super glue and a can of spray paint. Super simple tutorial: Glue on the letter, spray paint, hang. Voila.


And, of course, these guys have to live somewhere in our home so this is their room. :-)

Friday, May 3, 2013

Master Suite Before & After

Continuing the celebration of our one year house-iversary...the before and after of our master suite.

One of my favorite rooms in our house is our master suite. I guess it's technically two rooms but there is no door between them. Our bedroom has huge windows overlooking the yard and forest preserve and vaulted ceilings. Our bathroom has the same vaulted ceilings and is open to the bathroom. The toilet is tucked away in its own room which was a huge selling point. I don't know if we can ever go back after having this luxury. I think it's essential for a happy marriage.

We knew the master had a lot of potential when we viewed the home but the color was so dark and the way the furniture was organized blocked a lot of light from the windows. Here's the before with a dark, wine colored paint.


And now for OUR space...light and bright blue paint with an accent wall (Martha Stewart's Peacock mixed at Benjamin Moore), all our bedding we registered for at Macy's finally broken out for our king size bed and rearranged furniture. And a Casablanca ceiling fan (a gift from my parents) which is amazing.

Wedding day photos were printed poster size and inserted into IKEA 20X20 frames.
The woods look amazing in the summer and fall!
Playing with the panorama function on our camera - the entrance to the master bath is the opening on the left.
The master bathroom was brown. So very brown. Brown paint, brown shower curtain, brown floor and light brown cabinets. Oh, brown towels. I guess they liked brown. And lights from the 90s.


Here's our new master bathroom. I painted the cabinets using Rustoleum's Cabinet Transformations Kit in Espresso (big fan!) and we updated the light fixture. We chose to use the same paint color as the bedroom since these rooms flow into each other. Throw in a new shower curtain, rugs and towels and it looks like a totally different room.

Ahhhhhhhhhh!
Art from my Bachelorette Party which matches the bathroom perfectly

 We love it!


Tuesday, April 30, 2013

Under Construction

This is what our yard looked like when we moved in. Actually, this picture is after we cut down about 10 dead trees.


Fairly pretty with fall colors but super overgrown with invasive trees, trees growing into other trees, broken branches, boulders, snarls or thorny bushes and tree roots. Not usable at all. We own this. We pay taxes on this! We want to be able to use it!

Here's what it looked like when I got home last night! This is after day 1 of landscaping and patio installation.


And, of course I did this:


More to come!!


Tuesday, April 16, 2013

BzzAgent - Buzzing about Green Giant

Have you ever heard of BzzAgent? I've been a BzzAgent for 5+ years now. It's a program where you can sign up to try new products for free and you share what you love with your friends. You can learn more on their website.

I originally signed up because I'm in marketing and wanted an understanding of how it works. I've participated in probably 20 campaigns now...usually 1 a quarter. I never want to do too many at once so I don't feel overwhelmed to fill out the surveys. You have to do a pre and post campaign survey for brand campaigns you participate in.

I've never blogged about something from BzzAgent before but I really like the brand I'm trying now so I thought I'd share!

I am part of the Green Giant Veggie Snack Chips campaign right now. The Jolly Green Giant is now in the snack aisle and there are two flavors. Scott was surprised by how good they are. I like how thin the Sweet Potato chips are and I love that they are so crispy. I like that they are made with real veggies and have a lot of whole grain; makes me feel better about snacking! Let's be real: I'll take my veggies anyway I can get them.

I haven't seen these at my grocery store yet (I received these in the mail) but I'm going to keep my eye out for them.


Here's more info:
  • Roasted Veggie Tortilla Chips with Zesty Cheddar are crispy tortilla chips made with real vegetables like carrot, broccoli, and tomato, plus 17g of whole grain
  • Multigrain Sweet Potato Chips with Sea Salt are made with real sweet potatoes and 14g of whole grain, with 40% less fat than regular potato chips*
*Green Giant Multigrain Sweet Potato Chips (6g per 28g serving) have 40 percent less fat than regular potato chips (10g per 28g serving).


Legal Disclaimer: I received two bags of Green Giant chips for free as part of the BzzAgent Campaign. I was not paid to write this post.

Sunday, April 14, 2013

1 Year House-iversary

Happy one year of home ownership to us! It's so hard to believe that just one year ago we got the keys to the kingdom, ha! I remember the day clearly...we started with breakfast in the 'burbs, went to our closing, drove immediately to our house and laid on the carpet in the empty family room smiling ear to ear.
Closing day smiles

Texting our family telling them we were officially homeowners!
 We have taken on many projects since we moved in, some big and some small. Over the next couple weeks, I'll be sharing some before and after pics of our home. One year in, we are nowhere near completion of all the updates (again, big and small) that we want to make. But, we have definitely made progress and the house feels like our home. And, summer project season is coming. ;-)

Here's the first project I'll share...the outside of our home. We've updated the light fixtures with chunkier, more modern fixtures that are solar. We love them. They automatically turn on at dusk and off at dawn. I love coming home to lights on when Scott is out of town! We also added some character to our garage door with a hardware kit. We think both these updates make a big difference in the curb appeal. Still on the to do list: paint the front door a brighter color (bright blue or red - cannot decide!!), get the lawn and landscaping in better shape and add a storm/screen door for ventilation in the house.
Home exterior on closing day
And, today
Close up of garage hardware and new lights

We'd be remiss not to say a huge THANK YOU to everyone who has helped us with home updates along the way. Our home would not be in the shape it's in today without tons of help from our family!


Thursday, April 4, 2013

Family Yearbooks

With digital cameras, it's so easy to take pictures and forget about them. I have had a digital camera for almost 10 years and I can count the number of times I've actually printed pictures on one hand. It's just not something I think to do. And, when I do, it's overwhelming.

This year I decided to do something about it. I knew that if I didn't take stock of the photos I have on my computer now, I never would. I want our future kiddos to be able to flip through photos of Scott and me when we were young and dating. It was time to institute the Sayler Family Yearbook.

So, the daunting task began. I started by going back to 2008 when Scott and I met. We didn't actually take any pictures together that year since we met in December so I fast forwarded to 2009. I pulled all my favorite photos (candids and bigger events) into a folder on my hard drive. I did the same thing for 2010. Pulling the photos was the most time consuming part. But it was so so so entertaining!

I did some research to decide what photo book company I wanted to go with. After much debate, I chose MyPublisher. I'm very happy with the quality of their books and their pricing (they always have specials). The software to assemble your book is average; a little clunky but you can do some customizing which is nice.

I prefer a really clean look for photo books vs. backgrounds and lots of colored text. And, I like a photo wrapped cover. The book turned out amazing. I'm so happy with it!
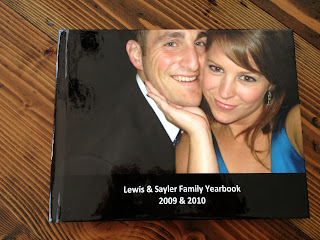
Front cover
I created a "Highlights" page for each year - it also breaks up 2009 and 2010
A few photo spreads


I like pairing one big photo with a block of smaller ones
Grouping like pics together worked really well...these are all concerts
Priceless shots from our engagement on the beach
 The book is about 80 pages long and is about a half inch thick. Much easier to store than big three inch photo albums! I have the year listed on the front and on the spine and am planning to keep the same format each year. I've finished 2011 and am adding in 2012 pics. I think from 2013 on, I'll go with one book per year because I've noticed I'm taking a lot more pictures with our new camera. (A SONY NEX-5N in case you're in the market. We LOVE it!)

My goal is to build the book throughout the year so it isn't such a big task at the end of the year. We'll see how that goes for me!